
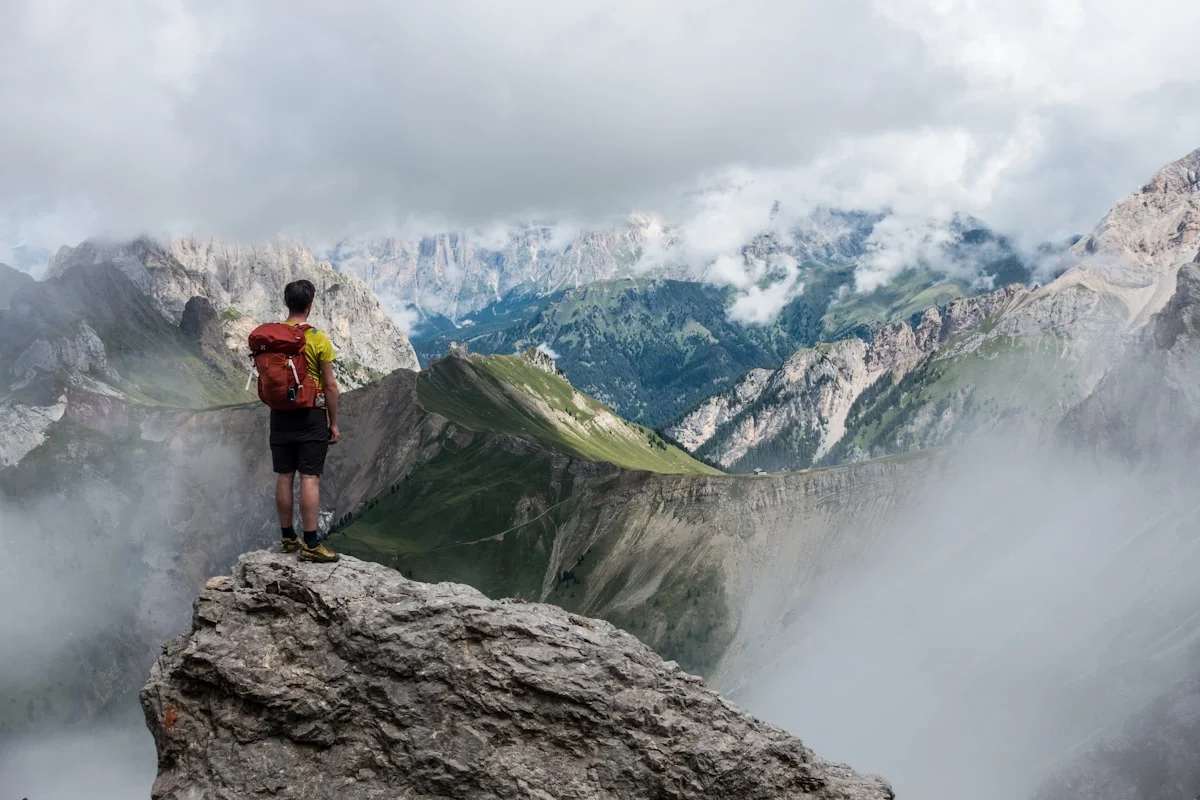
What to Wear on Kilimanjaro: The Complete Layering Guide
Temperature drops 3°F per 1,000 feet. Here's exactly what to wear at each altitude zone.
Temperature drops 3°F per 1,000 feet. Here's exactly what to wear at each altitude zone.
Quick Fact: Kilimanjaro's summit is 19,341 feet and can hit -20°F at night. Proper layering keeps you warm without bulk.
Climbing Kilimanjaro means hiking through five climate zones in less than a week—from tropical rainforest at 60-75°F to arctic summit conditions at -10°F to -20°F. The temperature drops approximately 3°F for every 1,000 feet you climb, creating a dramatic 80-90°F temperature range from base to summit. Understanding what to wear at each altitude zone and mastering the layering system is the difference between a comfortable, successful climb and a miserable, potentially dangerous struggle with cold and hypothermia.
This comprehensive guide explains the proven 3-layer system used by experienced climbers, details exactly what to wear at each temperature zone, and reveals the most common (and deadly) clothing mistakes. You'll learn why cotton kills at altitude, why mittens beat gloves at the summit, and how to avoid the sweat-freeze cycle that derails so many climbs. Whether you're a gear enthusiast researching every detail or a practical climber who just wants to know what works, you'll find the answers here—backed by real climbing experience on Kilimanjaro and proven temperature management science.
From moisture-wicking base layers to insulated mid-layers to wind-blocking outer shells, and from summit-specific extremity protection to common packing mistakes—this is your complete reference for what to wear on Kilimanjaro. For the complete list of what to pack and how to organize your gear, see our detailed Kilimanjaro packing list.
The layering system is the fundamental principle that makes temperature management possible on Kilimanjaro. Instead of relying on one heavy jacket, you use multiple specialized layers that can be added or removed as temperatures change throughout the day and across altitude zones. This system is used by mountaineers worldwide because it works—keeping you warm without bulk, dry without sweat buildup, and protected without overheating.
Kilimanjaro creates unique temperature challenges that a single-layer approach cannot solve:
Extreme temperature range: You'll experience 80-90°F variation from base to summit. No single garment can handle both tropical heat and arctic cold effectively.
Constantly changing conditions: You heat up while hiking (even at altitude), then cool down dramatically when you stop. Layering allows you to adjust your warmth minute-by-minute without carrying multiple complete outfits.
Moisture management: Your body produces significant heat and sweat while climbing. If that moisture is trapped against your skin, you'll freeze when you stop moving. Layering separates moisture-wicking from insulation from weather protection, allowing each layer to do its job.
Versatility: Weather can change rapidly on Kilimanjaro. Rain in the forest zone, wind in the alpine desert, snow at the summit. Layering lets you adapt to changing conditions without overpacking.
Layer 1: Base Layer (Moisture Management)
Function: Wicks sweat away from your skin and keeps you dry
Material: Merino wool or synthetic (polyester/nylon blends)
Critical rule: NEVER cotton—cotton absorbs moisture and loses all insulating value when wet
Coverage: Full body (top and bottom) worn directly against skin
Your base layer is your first line of defense against the cold. When you hike, your body generates heat and sweat. If that moisture stays against your skin, it will evaporate and cool you dangerously when you stop moving. Base layers pull moisture away from your skin and move it to the outer surface where it can evaporate without chilling you.
Layer 2: Mid Layer (Insulation)
Function: Traps warm air and provides insulation
Material: Fleece, synthetic insulation, or down (for extreme cold zones)
Adjustability: You'll add/remove mid-layers multiple times daily
Typical setup: One lightweight fleece for moderate zones, one heavy fleece or down jacket for cold zones
Mid-layers create dead air space that holds your body heat. The more loft (thickness), the warmer the layer. You'll start with minimal mid-layering in the rainforest and progressively add layers as you climb. At the summit, you might wear two or even three mid-layers depending on conditions and your personal cold tolerance.
Layer 3: Outer Layer (Weather Protection)
Function: Blocks wind and rain while allowing moisture to escape
Material: Waterproof-breathable fabric (Gore-Tex or similar) for hard shells; wind-resistant soft shells for dry conditions
Critical features: Sealed seams, adjustable cuffs/hood, pit zips for ventilation
Usage: Rain jacket in lower zones, wind shell at high altitude
Your outer layer is your shield against the elements. Wind dramatically increases heat loss through "wind chill"—at -10°F with 30 mph wind, the effective temperature drops to -40°F. Rain and snow can soak through insulation layers, destroying their warmth. Your outer shell prevents this while allowing water vapor from sweat to escape (if it's breathable).
Picture each layer as a specialist doing one job perfectly:
Base layer pulls moisture off your skin → Mid-layer traps warm air and provides insulation → Outer layer blocks wind and precipitation while letting moisture escape.
This separation of functions is more effective than any single garment trying to do all three jobs. You stay dry (base layer), warm (mid-layer), and protected (outer layer) without the bulk, inflexibility, and poor moisture management of a single heavy jacket.
Practical example at different zones:
Rainforest (warm, humid): Base layer + light outer shell for rain = comfortable
Alpine meadow (cool, breezy): Base layer + fleece mid-layer = comfortable
Alpine desert (cold days, freezing nights): Base layer + fleece + down jacket at camp = comfortable
Summit night (-10°F, windy): Base layer + fleece + down jacket + wind shell + all extremity protection = survival
Kilimanjaro's five distinct climate zones create dramatically different temperature and weather conditions. Understanding what you'll face at each zone allows you to plan your layering strategy and anticipate when to add or remove clothing.
| Altitude | Zone | Temperature | Main Concern | What to Wear |
|---|---|---|---|---|
| 0-3,000 ft | Rainforest | 60-75°F | Rain, humidity, mud | Base layer top, light pants, rain jacket, gaiters |
| 3,000-8,000 ft | Cloud Forest | 45-60°F | Cool, damp, misty | Base layer, lightweight fleece, rain protection |
| 8,000-12,000 ft | Alpine Meadow | 30-45°F | Wind, cool temps, sun exposure | Base layer, fleece, hat, gloves for morning |
| 12,000-15,000 ft | Alpine Desert | 15-30°F | Extreme cold at night, wind | Full layering, down jacket at camp, insulated gloves |
| 15,000-19,341 ft | Summit Zone | -10 to -20°F | Extreme cold, high wind, altitude | All layers, balaclava, mittens, hand warmers |
Diurnal temperature swings: Temperatures vary dramatically between day and night at the same altitude. At 12,000 feet, daytime temperatures might reach 40°F while nighttime drops to 15°F—a 25°F swing. This is why you add and remove layers constantly throughout the day.
Seasonal variation: The temperature ranges above are annual averages. During dry season (January-March, June-October), nights are colder and skies clearer. During wet season (April-May, November), temperatures are slightly warmer but rain is more frequent. See our Kilimanjaro weather guide for seasonal details.
Wind chill factor: Wind dramatically increases the effective cold. At 15,000+ feet, winds of 20-40 mph are common, making -10°F feel like -30°F or colder. This is why wind protection (outer shell) becomes critical at high altitude.
Personal variation: Everyone's cold tolerance differs. Some climbers are warm-blooded and comfortable with minimal layers; others run cold and need maximum insulation. These guidelines are averages—adjust based on your personal experience with cold.
Rainforest Zone (Day 1-2): Start conservative with layers. You'll be working hard hiking uphill in humid conditions. Most climbers wear just a base layer top with lightweight pants and carry their rain jacket. Don't overdress—sweating heavily on Day 1 soaks your base layers and starts you off wrong. Gaiters are essential to keep mud out of your boots.
Alpine Meadow Zone (Day 3-4): This is where layering flexibility becomes critical. Mornings are cold (30-35°F), midday sun can be warm (45-50°F), and evenings drop again. You'll add/remove your fleece layer 3-4 times daily. Start each morning with more layers than you think you need, then remove them before you overheat.
Alpine Desert Zone (Day 4-5): Nights become seriously cold. You'll wear your down jacket at camp in the evening and sleep in multiple layers. During the day, high-altitude sun can still warm you while hiking, but you'll cool rapidly when you stop. Wind becomes a major factor—always have your wind shell accessible.
Summit Zone (Summit Night): This is where your layering system is tested. You'll wear every layer you brought: base layer, fleece, down jacket, wind shell, plus full extremity protection. The combination of altitude (moving slowly, less body heat), temperature (-10°F or colder), wind, and nighttime creates the coldest conditions of your climb.
Your base layer is the foundation of your entire clothing system. Get this wrong—especially by wearing cotton—and no amount of expensive outer layers will save you from being cold and miserable. Get it right, and you'll stay dry, warm, and comfortable from rainforest to summit.
The "cotton kills" mantra is not hyperbole on Kilimanjaro—it's survival science. Cotton's properties make it perhaps the worst possible fabric for high-altitude climbing:
Cotton absorbs moisture: Cotton fibers absorb up to 27 times their weight in water. When you sweat (and you will sweat while hiking), cotton soaks it up and holds it against your skin.
Cotton loses all insulation when wet: Unlike wool or synthetics, wet cotton has virtually zero insulating value. The water conducts heat away from your body 25 times faster than air.
Cotton dries extremely slowly: At altitude, where humidity is low but temperatures are cold, cotton can take days to dry. This means you'll wear wet clothing for multiple days.
The death spiral: You sweat while hiking → cotton absorbs it → you stop for a break → wet cotton cools you rapidly → you get dangerously cold → you become hypothermic.
This isn't theoretical—climbers wearing cotton underwear and socks have suffered serious cold injuries on Kilimanjaro even when their outer layers were excellent. Avoid cotton completely: no cotton underwear, no cotton socks, no cotton t-shirts, no cotton anything.
Merino Wool (The Gold Standard)
Merino wool is the preferred base layer material for serious climbers and for good reasons:
Superior moisture management: Merino wicks moisture away from skin while maintaining insulation even when damp. It can absorb up to 30% of its weight in moisture while still feeling dry to the touch.
Temperature regulation: Merino keeps you cool when warm and warm when cool through natural fiber structure that creates insulating air pockets.
Odor resistance: Merino naturally resists bacterial growth, which means it doesn't develop the intense smell that synthetics do after days of wear. This matters when you're wearing the same base layer for 5-9 days straight.
Comfort: Modern merino is soft, non-itchy, and comfortable against skin for extended wear.
Drawbacks: More expensive than synthetics (expect $60-100 per garment); less durable than synthetics (can develop holes over time); dries slightly slower than synthetics (though much faster than cotton).
Synthetic Base Layers (Polyester/Nylon Blends)
Synthetic base layers are a proven alternative to merino:
Fast drying: Synthetics dry faster than merino, which can be valuable in the humid rainforest zone.
Durability: Synthetic fibers are tougher and less prone to holes and tears.
Cost: Generally cheaper than merino ($30-60 per garment).
Moisture-wicking: Modern synthetics wick moisture effectively, though they don't regulate temperature quite as well as merino.
Drawbacks: Develop strong odors quickly (bacteria love synthetic fibers); don't regulate temperature as effectively as merino; can feel clammy when damp; less comfortable for multi-day wear.
Merino-Synthetic Blends
Many climbers choose blended base layers (60-80% merino, 20-40% synthetic) that combine merino's odor resistance and comfort with synthetic's durability and quick drying. These are excellent compromises for Kilimanjaro's varied conditions.
What to bring:
Base layer tops: Minimum 2, ideally 3
Base layer bottoms: Minimum 2
Weight explained: Base layer "weight" refers to fabric thickness measured in grams per square meter (gsm):
Proper fit: Base layers should fit snug but not tight. Too loose and they won't wick moisture effectively; too tight and they'll restrict movement and blood flow (bad at altitude).
Flat seams: Look for flatlock or seamless construction to prevent chafing during long days of hiking with a pack.
Long sleeves/legs: Full coverage protects against sun at altitude (where UV is intense) and provides warmth without adding bulk.
For women: Women's-specific base layers account for different body shape and typically fit better than men's sizes. Sports bras designed for multi-day wear are essential—choose moisture-wicking fabrics and avoid cotton entirely. For detailed women-specific considerations, see our women's Kilimanjaro guide.
Bringing too few: One base layer top isn't enough. You need at least two so you can wash/dry one while wearing the other, or have a backup if one gets soaked.
Wrong weight for summit: A lightweight base layer that works perfectly at 10,000 feet won't provide enough warmth at 19,000 feet. Bring a heavier option for summit night.
Ignoring fit: Trying base layers for the first time at base camp is too late. Test them at home on training hikes to ensure comfort and identify any hot spots or chafing.
Assuming winter underwear = base layer: Your regular thermal underwear might be cotton or cotton-blend. Check the label—if it's not 100% merino or synthetic, leave it home.
Mid-layers are your adjustable warmth—the layers you'll add and remove most frequently as temperatures and activity levels change throughout each day. These layers trap warm air and provide the bulk of your insulation, but they must also be versatile enough to work from 12,000 feet to the summit.
Fleece (Most Versatile)
Fleece is the workhorse mid-layer for Kilimanjaro. Made from polyester fibers, fleece provides excellent warmth-to-weight ratio, breathes well during activity, and continues insulating even when damp.
Why fleece works:
Fleece weights:
Recommended fleece setup: One midweight fleece for active hiking + one heavyweight fleece or fleece jacket for camp and colder zones.
Down Insulation (Maximum Warmth)
Down jackets provide the highest warmth-to-weight ratio of any insulation material. They're essential for summit night and high-altitude camps where temperatures drop to -10°F or below.
Why down is critical for summit:
Down drawbacks:
Fill power explained: Fill power measures down quality (how much space one ounce of down fills in cubic inches). Higher fill power = warmer, lighter, more compressible:
When to use down on Kilimanjaro: Down jackets are for static warmth at camp and during summit push. Put it on when you stop hiking, take it off before you start moving again. Never hike actively in your down jacket—you'll soak it with sweat and destroy its warmth for later.
Synthetic Insulation (Wet-Weather Insurance)
Synthetic insulation (PrimaLoft, Climashield, Thermoball, etc.) mimics down's warmth but maintains insulation when wet. It's a compromise option that works in more conditions than down.
Synthetic advantages:
Synthetic disadvantages:
Who should choose synthetic: Climbers on tight budgets, those climbing during wet season, or anyone worried about keeping down dry. Synthetic is also a good choice for your hiking insulation layer since you might wear it during light rain or snow.
Recommended layering setup:
Option 1 (Most Common):
Option 2 (Budget/Wet Season):
Option 3 (Maximum Warmth):
How much insulation do you need? This depends on your personal cold tolerance, but most climbers underestimate the insulation needed for summit night. At 18,000 feet in -15°F conditions with wind, moving slowly at 3am, you need serious warmth. If you run cold, bring more insulation than you think necessary. You can always take layers off, but you can't add warmth you didn't pack.
Full-zip vs pullover: Full-zip fleeces allow better ventilation control when you're working hard. Pullovers are lighter and more packable. For Kilimanjaro, full-zip is recommended for temperature flexibility.
Hood: A hooded insulation layer (especially down jacket) provides critical head warmth at high altitude. If your down jacket doesn't have a hood, make sure you have an excellent insulated hat.
Pocket placement: Chest pockets or high hand pockets work better with a pack hip belt than low pockets (which the belt blocks).
Fit over base layers: Your mid-layers need to fit comfortably over base layers without being so large they create excess bulk. Too tight restricts movement and blood flow; too loose creates air gaps that reduce insulation.
Your outer layer is your first line of defense against wind, rain, and snow. While base layers manage moisture and mid-layers provide warmth, outer shells protect everything beneath from the elements. On Kilimanjaro, where wind speeds can reach 50+ mph at altitude and rain is common in lower zones, choosing the right outer layers is critical for staying dry and preventing dangerous heat loss.
A hard shell rain jacket is your essential weather protection on Kilimanjaro. These jackets use waterproof-breathable membranes (Gore-Tex, eVent, proprietary fabrics) that block rain and wind while allowing water vapor from sweat to escape.
Why you need a hard shell:
Critical features for Kilimanjaro hard shells:
Fully waterproof: Not "water-resistant" or "DWR coating." You need a jacket with a waterproof-breathable membrane and sealed/taped seams. Budget shells with unsealed seams will leak at the stitching.
Hood that fits over a hat: You'll wear a warm hat underneath your shell hood at summit. Make sure the hood is large enough and has adjustment cords to cinch it tight in wind.
Pit zips (underarm vents): These zippered vents allow you to dump excess heat without removing your jacket. Critical for managing temperature during active hiking in rain.
Adjustable cuffs and hem: Velcro or elastic cuffs seal out wind and rain at wrists. Drawstring hem prevents the jacket from riding up when wearing a pack.
Fits over all layers: Your shell needs to be large enough to wear comfortably over base layer + fleece + down jacket without restricting movement. Test this at home before your climb.
Breathability vs waterproofing trade-off: Highly waterproof jackets (20,000mm+ waterproof rating) tend to be less breathable, causing more internal condensation from sweat. Moderately waterproof jackets (10,000-20,000mm) breathe better but may leak slightly in prolonged heavy rain. For Kilimanjaro, aim for 15,000mm+ waterproof rating with good breathability (15,000g+ breathability rating).
Soft shells are stretchy, breathable jackets that provide wind resistance and light weather protection without the full waterproofing of hard shells. They're more comfortable for active hiking but won't protect you from sustained rain.
When soft shells work on Kilimanjaro:
Soft shell vs hard shell: Soft shells breathe better (more comfortable during exertion) but aren't truly waterproof. Most climbers bring a hard shell for guaranteed rain protection and use it as their wind shell at altitude. Soft shells are optional—nice to have, but not essential if you're managing budget and pack weight.
While your upper body faces the most exposure to wind and rain, lower body protection is also critical on Kilimanjaro.
Rain pants (waterproof): Essential for rainforest zone and any wet weather. Full-zip side-zip rain pants are ideal because you can put them on/take them off without removing your boots. Look for waterproof-breathable fabric with sealed seams.
Soft shell pants or wind pants: Lightweight, wind-resistant pants work well for high-altitude zones where rain is unlikely but wind is constant. More breathable than rain pants for active hiking.
Hiking pants strategy: Many climbers wear convertible zip-off pants (shorts in warm zones, full pants when cool) as their primary hiking pants, then add rain pants or wind pants as an outer layer when weather demands.
Gaiters wrap around your lower legs and ankles to seal the gap between your pants and boots. They're critical equipment that many first-time climbers underestimate.
Why gaiters are essential on Kilimanjaro:
Gaiter types:
Material: Waterproof-breathable gaiters work best—they block rain and mud while allowing sweat vapor to escape. Budget gaiters are fine for Kilimanjaro; this isn't technical climbing.
Bringing only a lightweight rain jacket: Budget rain jackets often lack durability, sealed seams, and functional hoods. Spending $100-150 on a quality rain jacket is worthwhile—it's one of your most important pieces of gear.
Oversized shells "for layering": Shells should fit over all your layers, but excessively large shells flap in the wind, let cold air in through gaps, and don't protect effectively. Get proper fit, not tent-sized.
Assuming you won't need rain protection: Even during "dry season," rain occurs on Kilimanjaro. The rainforest zone is humid and wet year-round. Don't gamble on weather—bring a proper rain jacket.
Skipping gaiters: Gaiters cost $30-60 and save your climb from wet boots and blister hell. They're non-negotiable unless you enjoy suffering.
Your body's core can be perfectly warm, but if your hands, feet, or head are cold, you'll be miserable and at risk for frostbite. Extremities are the first parts of your body to lose heat, especially at altitude where reduced circulation and extreme cold create serious challenges. Proper protection for hands, feet, and head is as important as your layering system.
The old saying "you lose 40% of your body heat through your head" is a myth, but your head does play an outsized role in temperature regulation because it has high blood flow and limited fat insulation. More importantly, you can't add "layers" to your head the way you can to your torso, so choosing the right head protection is critical.
Warm hat (beanie/watch cap):
Essential for all altitude zones above rainforest. Look for:
Bring at least one warm hat; many climbers bring two (one midweight, one heavyweight for summit).
Balaclava (face mask):
A balaclava covers your entire head, neck, and face except eyes. It's essential for summit night when temperatures hit -10°F to -20°F with high wind. Wind chill can freeze exposed skin in minutes.
When you need a balaclava: Summit night (above 15,000 feet). Below this altitude, most climbers use a buff/neck gaiter + warm hat combination, but at summit, full face protection becomes critical.
Material: Fleece or merino wool. Some climbers prefer lightweight synthetic balaclavas that breathe better during the exertion of summit push.
Buff/neck gaiter:
A versatile tube of fabric that can be worn as a neck warmer, headband, or pulled up to cover your lower face. Useful for sun protection (alpine zone sun is intense) and warmth at moderate altitudes. Lightweight, packable, and multipurpose.
Sun hat/cap:
In the alpine meadow and alpine desert zones (8,000-15,000 feet), daytime sun exposure is extreme due to high altitude (UV increases 10-12% per 3,000 feet). Many climbers bring a lightweight sun hat with brim for daytime hiking, then switch to warm hat for camp and cold conditions.
Hands are particularly vulnerable to cold on Kilimanjaro because they're far from your body's core, have poor insulation, and are constantly exposed to wind. The challenge is balancing warmth with dexterity—you need warm hands, but you also need to operate zippers, adjust gear, and use trekking poles.

Liner gloves (thin, dexterous):
Lightweight gloves worn as a base layer for hands. Essential for:
Material: Merino wool or synthetic. Never cotton. Bring at least two pairs so you have a dry backup.
Insulated gloves (moderate cold):
Midweight insulated gloves work well for hiking in the alpine meadow and alpine desert zones (30-45°F). Look for:
Insulated mittens (extreme cold/summit):
Mittens are warmer than gloves because your fingers share heat instead of being isolated. At summit temperatures (-10°F to -20°F), this difference is survival-critical.
Why mittens beat gloves at the summit:
Insulated mitten features:
Hand protection strategy for Kilimanjaro:
Minimum setup:
How to use them:
Pro tip - hand warmers: Chemical hand warmers (the disposable packets that generate heat) are valuable insurance for summit night. Slip them inside your mittens for extra warmth. They last 6-10 hours, perfect for summit push.
Boots get all the attention, but socks are equally critical for warm, blister-free feet on Kilimanjaro. Cold feet make you miserable; wet feet cause blisters; blisters can end your climb.
Hiking socks (for daily use):
Material: Merino wool is the gold standard. Synthetic blends work too. Absolutely never cotton—cotton socks are a guaranteed blister factory and provide zero warmth when wet (which they will be from sweat).
Weight: Midweight to heavyweight hiking socks (not ultra-thin running socks, not extremely thick ski socks). Your socks should match your boot fit—if you sized your boots to accommodate thick socks, wear thick socks. Mismatched sock thickness causes blisters.
How many: Minimum 3 pairs, ideally 4-5. You'll wear socks for multiple days (this is normal and fine with merino wool), but you want dry socks available for summit night and as emergency backups.
Sock strategy:
The two-sock debate: Some climbers wear two pairs of socks (thin liner sock + thick outer sock) to reduce friction and blisters. Others find this causes more problems (too tight boots, restricted circulation). Test this at home on training hikes—what works varies by individual.
Sock fit: Socks should fit snugly without bunching or excess fabric that creates friction points. Too-large socks bunch and blister; too-small socks restrict circulation (very bad at altitude).
Only bringing lightweight gloves: "But I have warm hands!" means nothing at -15°F with 40 mph wind at 18,000 feet. Bring serious hand protection.
Forgetting backup liner gloves: If your only pair gets wet or lost, you're in serious trouble. Liner gloves weigh 2 ounces and pack tiny—bring two pairs.
Cotton socks "because they're comfortable": Cotton comfort lasts about 2 hours until your socks are soaked with sweat. Then you have wet, cold feet for the next 7 days. Merino wool is actually more comfortable once you try it.
Not testing sock-boot combination: Break in your boots with the exact socks you'll wear on Kilimanjaro. Different sock thickness = different fit = different blister points.
Assuming your winter hat is adequate: If your "winter hat" is a fashion beanie that barely covers your ears, it's not adequate for Kilimanjaro summit. You need serious warmth.
Summit night is when your entire clothing system faces its hardest test. You'll wake around 11pm-midnight at approximately 15,500 feet, dress in every layer you brought, and begin a 6-8 hour push to the summit. Temperatures will be -10°F to -20°F (before wind chill), you'll be moving slowly (generating less body heat than normal hiking), and the altitude will make everything feel harder. This is the night when clothing mistakes become dangerous and proper layering becomes survival.
Extreme cold + high altitude: The combination of summit zone temperatures and altitude creates conditions your body has never experienced. At 18,000+ feet, your body is operating on half the available oxygen, generating less heat, and struggling with basic functions.
Minimal movement heat: During regular hiking, you generate significant body heat through exertion. On summit night, you move slowly due to altitude and fatigue. You're barely generating enough heat to offset the cold environment.
Long exposure time: Summit push takes 6-8 hours round trip. You'll be exposed to extreme cold for most of a night. This isn't a brief dash to the top—it's sustained cold exposure.
3am factor: You'll reach the summit around 6-7am, but the coldest part of summit night is 3-4am when you're still climbing. This is when most people struggle with cold.
Wind chill: Summit zone winds of 20-50 mph are common. At -10°F with 30 mph wind, the effective temperature (wind chill) drops to -40°F. Your outer shell becomes absolutely critical.
This is the proven layering system that works for summit night:
Lower body:
Upper body:
Hands:
Head:
Feet:
Total layer count at summit: You're wearing 7-8 layers on your torso (base + fleece + down + shell), 3-4 on your legs, and every extremity is protected. This seems like excessive bulk, but at -15°F with wind at 18,000+ feet, every layer matters.
Starting too cold: Some climbers start summit push feeling "a little chilly" to avoid overheating. This is a dangerous mistake. Start fully layered. You can vent heat through pit zips and by loosening cuffs, but you can't add warmth you didn't pack. By the time you realize you're too cold (at 2am, at 17,000 feet), it's too late.
Removing layers too early: If you get slightly warm an hour into summit push, resist the urge to shed layers immediately. You're still low, your body is still fresh, and you're moving at your fastest pace of the night. Once you climb higher and fatigue sets in, you'll need those layers back.
Wet base layers from previous days: If you've been sweating heavily into your base layers for 5 days without changing, they'll have reduced insulating power. Change into fresh base layers before summit night if possible, or at minimum change into dry socks and dry liner gloves.
Forgetting to eat/drink: This isn't directly clothing-related, but your body generates heat through metabolism. If you're not eating and drinking (despite the altitude-killed appetite), your body produces less heat, and no amount of clothing compensates for that.
Cotton anything: Yes, we've covered this repeatedly, but it bears repeating: some climbers wear cotton underwear "because it's comfortable" and assume outer layers will compensate. At summit, cotton underwear against your skin will make you dangerously cold. No exceptions.
Despite perfect layering, some climbers still struggle with cold on summit night. If you're wearing all your layers and still dangerously cold:
Stop and assess: Are you hypothermic (shivering uncontrollably, confusion, loss of coordination)? If yes, descend immediately. Summit is not worth your life.
Increase movement: Move your arms, flex your hands, wiggle your toes. Muscle activity generates heat.
Eat simple carbs: Your body burns fuel to generate heat. Quick energy (candy, energy gels) can help if you've been too altitude-sick to eat.
Check layer interfaces: Make sure your shell jacket is fully zipped, cuffs are sealed, hood is adjusted, and there are no gaps where cold air infiltrates.
Communicate with your guide: If you're dangerously cold, tell your guide immediately. They can assess whether you should continue or descend.
For more details on what summit night is really like, see our complete Kilimanjaro summit night guide.
Understanding the theory of layering is one thing; making it work in practice on Kilimanjaro is another. These practical tips will help you avoid common mistakes and use your clothing system effectively.
The single most important practical rule: Start each hiking day feeling slightly cool, not warm.
When you begin hiking with a full pack uphill, your body generates significant heat within 10-15 minutes. If you start warm, you'll overheat quickly, sweat heavily, and soak your base layers. Wet base layers lose insulating power and will make you cold when you stop for breaks or arrive at camp.
How this looks in practice: When you leave camp in the morning at 8,000 feet (temperature 40°F), you might feel chilly wearing just base layer + lightweight fleece. That's correct. Within 15 minutes of hiking uphill, you'll warm up perfectly. If you start wearing base + fleece + down jacket, you'll be drenched in sweat within 30 minutes.
The adjustment window: It takes 10-15 minutes of hiking to know if you're dressed right. Start conservative, hike for 15 minutes, then adjust. Too warm? Remove a layer. Still comfortable? Perfect.
Don't wait until you're shivering to add layers. Cold fingers make it hard to operate zippers and put on gloves. Cold body means you're already losing heat faster than you're generating it.
When to layer up:
On Kilimanjaro, sweat is more dangerous than cold. Sweating heavily feels uncomfortable in the moment, but the real danger comes later when that sweat cools you at camp or during summit night.
Why sweat is dangerous:
How to avoid sweating:
Think of your clothing layers as creating a personal microclimate around your body. Small adjustments maintain that climate without major layer changes:
Ventilation before removal:
These small vents dump excess heat without requiring you to stop, remove your pack, and strip off an entire layer.
Insulation before sealing: When you're cold, first ensure your existing layers are working efficiently:
Only after maximizing your current layers should you add another layer.
In the rainforest and cloud forest zones, rain is the obvious threat, but internal moisture from sweat is actually more dangerous than external rain. A 100% waterproof jacket with poor breathability will trap sweat inside, soaking your base layers just as effectively as rain.
The waterproof-breathable trade-off: The most waterproof jackets are often the least breathable. For Kilimanjaro's lower zones where you're hiking hard uphill in humid conditions, prioritize breathability:
Above 12,000 feet: Breathability remains important, but rain becomes less common and wind becomes the primary threat. Your shell's windproofing matters more than maximum breathability at high altitude.
Summit is not the place to discover that your layers don't work together, your jacket doesn't fit over your down jacket, or your gloves are too tight to fit over liner gloves.
Pre-climb testing checklist:
Your layering system only works if you can access layers when you need them. Stuffing your fleece at the bottom of your duffel means you won't use it when you should because it's too much hassle to dig out.
Accessibility strategy:
For complete packing organization strategy, see our Kilimanjaro packing list guide.
After seeing hundreds of climbers succeed and fail on Kilimanjaro, certain clothing mistakes appear repeatedly. Avoid these, and you'll be ahead of 50% of first-time climbers.
We've mentioned this throughout this guide, but it's worth dedicated coverage because it's the #1 clothing mistake on Kilimanjaro.
Why cotton fails:
The places climbers wear cotton (and shouldn't):
The solution: Read every label. If it says cotton, polyester-cotton blend, or any percentage of cotton, leave it home. 100% merino wool or 100% synthetic only.
Many first-time climbers underestimate how cold Kilimanjaro's summit zone is, especially combined with altitude, wind, and nighttime conditions.
The logic trap: "I'll be hiking, so I'll generate body heat, so I don't need that much insulation." This works at lower altitudes but fails at summit. At 18,000+ feet on summit night, you're moving slowly (generating minimal heat), burning less efficient due to low oxygen, and exposed to -15°F + wind chill.
What "not enough insulation" looks like:
The fix: Bring more insulation than you think you need, especially if you tend to run cold. You can always leave a layer in your duffel at camp if you're too warm, but you can't create warmth from nothing at 3am at 18,000 feet.
Some climbers bring one extremely thick, warm parka and assume it will handle all conditions. This single-jacket approach fails on Kilimanjaro because:
No temperature flexibility: A super-thick jacket is either off (too cold) or on (too hot) with no middle ground. You can't adjust warmth precisely for changing conditions.
Sweat trap: Heavy jackets don't breathe well. If you hike in one thick jacket, you'll sweat heavily and soak everything underneath.
Wet jacket = no warmth: If your one thick jacket gets wet (from rain, sweat, or condensation), you have no dry insulation backup.
The layering advantage: Base layer + fleece + down + shell gives you 15+ warmth combinations by mixing and matching. One thick jacket gives you one option.
Budget rain jackets ($30-50) often have:
A quality rain jacket ($100-200) seems expensive until you realize it's your wind protection at summit, your rain shield in the forest, and potentially the difference between summit success and hypothermic failure.
Where to save money: You can economize on fleece, base layers, and accessories. Don't economize on your shell jacket.
Your torso can be perfectly warm, but cold hands, feet, or head will make you miserable and end your summit attempt.
Common extremity mistakes:
The fix: Invest in quality extremity protection. Mittens for summit, multiple glove options, warm hat + balaclava, and at least 3-4 pairs of merino socks.
Buying new gear the week before your climb and hoping it works is gambling with your summit success.
What goes wrong with untested gear:
The fix: Test every piece of clothing on training hikes before Kilimanjaro. Break in boots over 50+ miles. Wear base layers for full-day hikes. Identify problems at home where they're fixable, not at 17,000 feet where they're not.
"It fits well enough" becomes "this is unbearable" after 8 hours of hiking per day for a week.
Fit issues that seem minor but become major:
The standard: Clothing should feel comfortable after 8 hours, not just when you first put it on. Test on long hikes at home to verify comfort over time.
Mastering the layering system is one of the most controllable factors in your Kilimanjaro summit success. Unlike altitude acclimatization (which you can't fully control) or weather (which you definitely can't control), your clothing system is entirely within your power to get right.
The proven system works: moisture-wicking base layers pull sweat away from skin, insulating mid-layers trap warm air, and protective outer shells block wind and rain. Add proper extremity protection—warm mittens, quality socks, and full head coverage—and you're equipped to handle Kilimanjaro's 80-90°F temperature range from rainforest to summit.
Avoid the deadly cotton mistake, bring enough insulation for summit night's extreme cold, and test everything at home before you climb. Start each day cool and layer up before you get cold. Manage your microclimate through ventilation and strategic layer adjustment rather than constant on-off cycling.
Your layering system is your first line of defense against Kilimanjaro's environmental challenges. Get it right, and you'll be comfortable, warm, and focused on the incredible experience of climbing Africa's highest peak. Get it wrong, and you'll be miserable, cold, and possibly unable to summit.
The mountain will provide the challenge and the views. Your layering system provides the comfort and warmth to enjoy them.
KiliPeak offers transparent pricing, expert local guides, and comprehensive gear lists to help you prepare properly for your climb.
Start Planning Your Climb